Wednesday, November 28, 2012

Basics: Baking your polymer clay

Baking polymer clay

I feel like I havn't made a post in such a long time, even though it's only been 3-4 days.
I want to talk about baking polymer clay, whether it's charms, miniatures or figurines - I often get questions on my YouTube channel, asking me at what temperature I bake my things, for how long and how I avoid burning the clay etc.

*I dette indlæg vil jeg snakke om bagning af polyler (Cernit, Fimo) Hvilken ovn, hvor lang tid, hvordan man kan undgå at brænde leret mm.*

The very basics:

At what temperature should you bake your clay?
Always check the package - it will tell you the temperature you should bake that specific brand at and how long you can bake it. A lot of brands will say 15-30 minutes, and they'll only have a small difference in the temperature setting. eg. Fimo says 110 degrees celcius, I believe?, and Cernit says 130 degrees celcius... Those have been my 2 favorite brands since I started working with polymer clay, so I do mix them a lot when making my miniatures and charms, and I do take that into consideration when baking. Usually I'll bake my creations at around 110-120 degrees celcius, just so that I don't bake the Fimo at a temperature that's way too high.

For how long should you bake your creations?
Again, check the package - as I mentioned above a lot of brands have a time frame of 15-30 minutes. I most often bake my creations for 20-30 minutes.
If you underbake, the polymer clay won't obtain its full strength and will be more prone to breaking. This can also happen if you overbake, so stay within that time frame but don't take it out of the oven too soon.
Polymer clay is a fairly strong and durable medium but it's not unbreakable. When working with dollhouse miniatures it's not as great a concern as it is when making jewelry - Though both dollhouse miniatures and jewelry should be treated with respect, and shouldn't be thrown around or dropped.

What type of oven?
Kitchen oven: A lot of people have heard that you can't use your kitchen oven to bake polymer clay because of fumes and toxins... Don't worry, you can use your regular oven, but don't burn the clay (this is what causes the "fumes" that so many talk about). However, I remember reading a post on an online forum about this person who'd forgot to turn his/her oven off when leaving the house (while the polymer clay was still in the oven). He/She had a pet bird that was sitting in the room, and though the clay had been baked for way too long and had been burnt, the bird was just fine. Of course I'd suggest following one guideline; If you're going to use a regular kitchen oven (I do), have a special baking tray ONLY for polymer clay. That's really the only concern - don't use a tray that you're going to use for food. You can use a regular baking tray, put baking paper on and then bake your polymer clay, that way you can still use the tray for food since it hasn't been in contact with the polymer clay.
Toaster oven: .... well, I know that MANY use toaster ovens for their polymer clay projects and I can understand why you might want to use one; it's smaller and easier/cheaper to heat up. It's used just for your crafts so you don't have to worry about any "toxins" and it's convenient because you can have it standing in your craft room/corner without taking up a lot of space and so forth.
I've tried baking clay in a toaster oven a couple of times, and my experience is that they're way too hard on the clay. My pieces ended up being discolored or a lot more fragile, so this is not a type of oven I'll be using ever again for clay.
Microwave: No... nope... DON'T!,..

-->

Tips for baking:

You know how the bottom of the clay piece (the one touching the baking tray) becomes flat or misshapen? That really annoyed me when making three dimensional objects (mainly charms and dolls), and I know that most times you'll be able to cover it up or you won't even notice it because it's the bottom, but sometimes that's just not good enough. I found this ceramic fibre blanket on metalclay.co.uk. It only cost 3.95£.
This is probably one of the best things I've purchased, clay wise, for a long time. In the picture I was just about to bake my "Olsen banden" before making the hands and feet. This blanket is such a great thing to have, especially when making dolls that have their heads turned so the ears won't get squeezed flat. I also use it when making miniature "half pigs/large butcher pieces" that are going to be hanging and have to look good from all angles.

Making a tent out of tin foil is the easiest way to avoid burning the clay. It can probably still burn if you bake it long enough, but I havn't had that happen, even if I've baked something for 40 minutes.

Let me know if you have any other questions in regards to baking polymer clay :)

Saturday, November 17, 2012

Efcolor cold enamel - swatches

Efcolor cold enamel swatches


Earlier this week my second Efcolor enamel order arrived. This time they sent me a small booklet as well, showing how to use the powder, the different colors available and some examples of jewelry made/decorated with the product. I don't know why they didn't send me one of these booklets when I ordered the first batch (I ordered from metalclay.co.uk). Maybe it was because my other order had other things in it other than the efcolor powder, or maybe it was due to the size of this order?
Doesn't matter, I'm not going to use it for anything anyways :)

I now have 23 of the 29 regular (opaque) colors. Other colors available include a few transparent, metallic, texture and glitter shades. Unfortunately the site I ordered from does not have the metallic or transparent ones.


So here are the swatches. The first picture was taken in daylight, the second is daylight + flash. I intentionally picked the second one where you can see the light reflect on the surface of some of the bottom swatches.
The colors I have swatched:
Row #1: Dark red, red, strawberry, Rose pink/bright pink, Old rose, Light pink
Row #2: Brown, Cognac, Orange, Golden yellow, Yellow, Ivory
Row #3: Black, Dark grey, Silver grey, Sand, White, Mallow
Row #4: Dark blue, Pigeon blue, Turquoise, Olive, Light green
-->

I'm in love with the earthy tones - bet they'll look great as coloring on many different types of miniature plates, cups, bowls and pottery. Will be playing around with some plate making today or tomorrow.

You can expect a couple of posts from me this weekend :)

Wednesday, November 14, 2012

Review: Foil

Testing out foil on polymer clay

In my first haul on this site I'd received a few packages, and one of the things I'd ordered was foil. I got the 'Lisa Pavelka' foil for polymer clay to try out since I've never used that kind of foil on my clay pieces before, but I figured it could create some nice effects for steampunk charms.


I no longer have the packaging, but I read the back which told you to use the foil on unbaked clay, using your finger to burnish and then sealing with a thin layer of liquid clay to protect it.

The foil sheet I used to experiment with is not the lisa pavelka sheets (later in the post I'll tell you which ones I used for the testing, but they work the same).

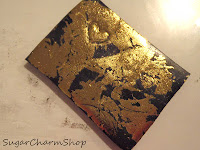
In this first picture I'd used my finger to quickly/lightly burnish the foil onto the clay. It worked well, it gave the clay an awesome metalic finish,.. but I hated how this didn't really give me much control as to where the foil was applied. To be fair, it would make an AWESOME background, both if you're covering the clay completely in the foil with no bare spots, or if you make a "cracked" effect like in my second picture by only applying the foil to sections of the clay.

I like knowing where the foil is going to be applied and I wanted to be able to make small patterns and other details, so I made a few experiments - which explains the dented heart shape you can see.


My first test was a embossing tool that I used to burnish instead. Now, I was aware that this method maybe wouldn't work how I wanted it to - the foil uses heat to transfer, and the embossing tool is cold metal, but one thing I don't understad is why the foil seemed to stick to every other spot than the place I'd burnished...

Oh well, I had one more tool I needed to try out;
After receiving the Lisa Pavelka foil in the mail I bought a "hot stamping/caligraphy"-ish pen. The supermarket I work at gets a bunch of new items each week, and once they sell out we don't get a new batch in weeks, months or maybe even ever. So at the time my foil arrived in the mail we coincidentally had these pens in the store. They came with 20 (I think) small sheets of foil and are meant for decorating envelopes, gifts etc.. I decided to buy one, even if I wouldn't end up using the pen I'd still have 20 lovely sheets of foil! :)

I first tested out the pen on unbaked clay which gave me the same result as the embossing tool. Finally I decided to test the foil on baked clay - I used the back of one of my charms.
With the embossing tool I was able to transfer a bit of foil but I wasn't able to make good looking patterns, so Iremoved it.  However, the heated caligraphy pen worked really well on the baked clay! I was able to easily make swirls and dots. I guess you could heat up an embossing tool and then use it the same way but it would probably take a bit longer.
A good thing about using the foil on baked clay is that it won't make the same dents as if the clay is raw and soft. You'll still need to protect the foil with glaze or liquid clay (I recommend liquid clay because it's more resistant to wear and tear).

I'll definitely be using this foil on some steampunk pieces and other charms/miniatures in the future :)

Sunday, November 11, 2012

Tutorial: Polymer clay plates

Polymer clay plates for miniatures, charms etc.

A tutorial for making miniature plates from polymer clay :) One of my most requested tutorials on my old blog.
*Note, This is just a quick demo - Take your time and make some good plates instead :)

En hurtig trin for trin guide til at lave tallerkener af Cernit/Fimo til miniature eller lignende.

--> When I first started out making miniatures I made my own plates as well. But, as I got more serious about making these tiny food items I began buying ceramic plates from miniature stores (actual stores and online) + ebay. At some point I AM going to make my own ceramics but at the moment there's no way my boyfriend will let me have a 1000○C kiln in the apartment.... So, I prefer buying my plates for now :) - However, sometimes you want a plate of a certain size, shape or color, and a homemade polymer clay plate could work.
I'm been on the lookout for a material that would give me a nice glossy look, and I've found one! But there are different finishes you can add to polymer clay plates, a couple of them are;
1, acrylic paint and glaze - can look really good!, I just wanted something a bit more durable than paint.
2, glaze alone - glaze can give a really nice look, the problem I find is that you have to apply a lot of glaze in order for it to look OK.

The material I've now found is Efcolor cold enamel. It's a powder which melts in the oven. It says "150○C" on the label but I baked my plates at 120○C and it worked just fine...
These powders create (as the name says) an enamel looking finish. The tubes aren't that big, I put them on my computer so you could get an idea of the size compared to the keyboard.

I've already ordered more colors. Would you like to see "swatches" once they arrive? - I know that it can be hard to choose colors just by looking at pictures websites provide you.

Here you can see swatches of the colors I chose in my first order. Left to right: White, ivory, sand, black, light pink.
I didn't try to make it neat, I just poured a bit of powder onto a piece of white Cernit.

-->


As I wrote in the beginning - This is just a quick demo to give you an idea of how I do when making my own polymer clay plates. Take your time and get as good a result as possible.
You can use this technique to make plates, bowls, trays, cups, whatever you want.

Materials you'll need:
-Polymer clay. I recommend white or a color matching the color you want your plate.
-Cookie cutters (you can do it without as well)
-Mold putty (I'm using amazing mold putty)
-Clay cutting blade
-Large ball tool, something that's rounded or even your finger.
-Liquid clay (not extremely necessary but you'll see what I use it for.
-Cold enamel powder (or glaze, paint etc if you prefer that)


1, There are more than one way you can begin this project. You can roll out a ball of clay and just flatten it with your fingers (which works just as well), or you can roll out a sheet of clay and cut out some circles. - This method is good if you want to have an exact height when making multiple sizes of plates.
2, Round off/smooth the edges to create a flat dome shape. Place something flat (eg. your blade) on the top and press down to get a flat bottom for the plate. Roll out a thin snake of clay.
3, Add the clay snake to the bottom. Use some sort of tool (I'm sorry this isn't mentioned in the material list) to smooth out the clay where the end pieces meet. You now have your basic clay plate :)
4, Bake and let cool. Now make some molds :)
5, Fill up your mold with clay and use the blade to trim off the excess.
6, Take your finger or rounded tool and press press it into the center. You'll need to go back with the blade and trim off clay a few times. Lastly I use my finger to just smooth everything out.
5, make a few plates
6, Now, you can either work on a piece of paper, pour on the powder, and pour the excess powder back into the bottle, or you can put the powder into some other container. I chose the last option :) The jar shown contains powder from just 1 bottle so there's definitely product enough for many projects.
7, I added some liquid clay to my fingers and spread it on the plates, then dropped them in the jar and used tweezers to turn it. You're supposed to drizzle the powder on top of a project but I thought this would be a good way of doing it :) Try to get an even coating. Even though it smooths out a bit in the oven you'll be able to see bumbs if it's applied unevenly.
Bake them and you're done! :)


Friday, November 2, 2012

Review; Liquid clay and Bake&Bond + making...

"Review";Liquid clay and Bake&Bond

+ Making frosting, icing, syrup, soup, blood, slime etc.

Excuse the long headline, haha.
In this post I'll be reviewing the liquid clays I have (+ bake&bond because it's pretty much the same thing). I'll also talk a bit about what the different liquid clays work well as, when it comes to making frosting, icing etc.

I frequently get questions about what type of liquid clay I use, how I make icing etc. So I hope this will answer any questions you may have - if not, feel free to ask! :)


About a year ago I made a post on my old blog comparing Fimo deco gel and the Sculpey bake&bond, but at that time it hadn't been very long since I purchased the bake&bond while the Fimo deco gel was something I'd gone through numerous bottles of... so I've now had quite a bit of time to really try out the bake&bond.
You're probably not able to see by looking at the picture but the Bake&Bond is almost full, after all this time. It just hasn't been a bottle I reach for that often - Don't get me wrong, there's nothing wrong with the product as far as liquid clay goes, but for the "bonding" I really don't find it better than Fimo deco gel or the regular Translucent liquid sculpey.
As I wrote in my review back then, when comparing bake&bond to the deco gel (tested how well they held together polymer clay and wood);

"The bake&bond is hard after baking while the deco gel obtain a more rubber-ish feel and stays very flexible" - which I found helped it grab on to the wood even better.
But what have I been using the bake&bond for then? *Drum roll* - Ketchup... yup, ketchup! pretty sad, isn't it? but on the bright side I really think it makes up for great ketchup/burger dressing and BBQ sauce because it's thicker than the other liquid clays I've tried. Just mix in some red, orange and maybe a bit of brown soft pastels (for ketchup) and voila! :) - it can be mixed with other things as well such as acrylic paint.
Color: Bake&Bond is white in the bottle but has a semi clear color after baking.

As far as I know there are 3 brands that makes liquid clay; Fimo, Sculpey & Kato.
Unfortunately I have yet to try the Kato liquid clay - and I intend to! at some point. But I feel the other ones provide all the qualities I need for now.

Comparing Fimo deco gel and Translucent liquid sculpey
For a long time the only liquid clay I'd tried and used was the Fimo deco gel, and it is still my favorite one! 
Colors before baking: TLS is white while the FDG is the only liquid clay which is clear while uncured. Colors after baking: They're both translucent after baking but the FDG reaches a higher transparency. Consistency while unbaked: TLS has an almost honey like consistency while the FDG is more runny. Consistency after baking: Both the TLS and FDG obtains a good flexibility after baking though the FDG is more clear.

Frosting/Icing; If you want a nice thick frosting or whipped cream you can mix some solid clay with liquid clay. Both TLS and FDG are good for this. You can do it the hard way; break some clay into tiny pieces, pour in some liquid clay and mix... and mix... and mix... and.... mix...
after doing this every time I figured out a couple of other ways of doing it.
Tip#1, if you're not in a hurry you can break the solid clay into pieces, pour in the liquid clay and let it sit for a day or so (maybe less time) - the liquid clay will 'break down' or soften the solid clay so it's easier to mix :)
Tip#2, The fastest and easiest way I've found might get your hands a bit sticky (Or you can use rubber gloves when doing this) - condition some solid clay in your hand till it's nice and soft, flatten it and drizzle on some liquid clay. Fold the clay and begin mixing the 2 between your fingers. You'll need to flatten the clay and add liquid clay a couple of times. When it gets to the point of being super soft and sticky put it into the container you want to store your frosting/whipped cream in, pour in some more liquid clay and mix with a tool. This is a more messy way of doing it but it's a lot faster, especialy for making larger portions.
*more solid clay will make the frosting/whipped cream thicker, more liquid clay will make it thinner and more like icing for cinnamon rolls and sugar cookies.
TLS makes good icing on its own - not the thick whipped cream effect, but its great for icing, blood, slime etc. Just mix in some soft pastels. (I used TLS and green pastel for the cupcake in the picture).
Syrup and soup: Though you can use TLS for syrup and probably soup as well, I don't think it gives you a result nearly as nice as when you use FDG. Leave it as it is (for a clear soup) or mix in pastels to get the perfect effect for melted butter, syrup and more.

If I had to choose only 1 type of liquid clay, I'd go for the Fimo deco gel. You can achieve everything from the clear soup to thick frosting + any other cool uses you can think of :)