Mixing polymer clay colors - when making realistic miniature food
This may sound like such an easy post to make, but it's not, at least not for me. I've postponed it so many times because I couldn't figure out how to go about doing it. I first thought of taking pictures for every color mix in an attempt of showing the exact amounts of clay mixed - but truth is, that I always eyeball the amounts of each color; once you mix them, you can add more of some colors to make the shade just right.
Besides - when I write 'basic bread/dough'-color, it's not going to be the color you want to use for all bread and pastries. Danish pastries, as an example, has a very yellow undertone while scone or dinner roll often has a more dull/grey undertone. The colors will need to be adjusted for each project, but I hope this will help some of you get a basic idea of how to mix the right color.
I'm sorry if some of this seems like a 'no brainer/doooh, of course!'-post, I'm just trying to go through the very basics - Definitely leave me feedback if you need something else added or for that matter, if you think this was helpful.
Tip #1: Look at the real thing.
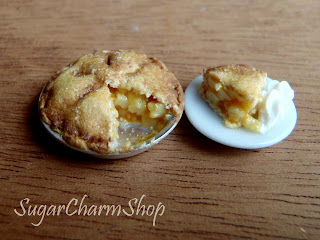
 I've told you many times that I have a picture of the real dish/food/item when I'm going to sculpt something. This will help you recreate the right shape, texture and color. 'Baked' stuff like bread or cooked things like a turkey are the tricky ones because you're not going to mix the color that you see on top - you'll need to look at what's underneeth.. Makes sense? eg. take this apple pie that I made; a nice golden brown, right?. No, if you look at where it's been cut you can see that it's an extremelt light doughy-type color. The same with a turkey - go for the color of the actual meat, not the crust.
Tip#2: Layer the colors!
An apple isn't just green or red - If you look closely you'll see lots of different shades which combined creates the final color. If you make a batch of cupcakes the top will become darker than the rest. Use the clay base in combination with soft pastels, paint etc.. Build up the color.
- Of course there'll be some things that are just 1 color; A piece of chocolate could be one of them.
On the pie I used a more yellow shade of pastel on top and as I moved towards the edge I used a golden brown, a red-ish brown and finally a dark brown.
Working with translucent clay;
The translucent colors are the ones I get the most questions about, and they're the hardest ones for me to explain. My best advice is to experiment; Know the material you're working with, know what it will look like once it's done baking. I find that you always need more of the 'translucent' clay than you think. The color may look too light when you're mixing, but it'll become a lot more vibrant once baked.
You can make small color samples and bake them to see what the final result will come out like before you begin making a huge project.
There are many ways of mixing each color, these are just examples of the mixes I use the most.
- Basic bread/dough:
I like starting of with a flesh/beige color as the base. Cernit fleshtone, Fimo sahara or champagne are great for this. Depending on which type of dough you need to make, you'll have to add more colors to it. Most often I'll mix in some yellow and sometimes a small amount of orange to make the color appear warmer. If I need to lighten the mixture I'll add white, and if I need to darken the mixture I'll add Fimo/Cernit 'caramel' so that it maintains the warm undertone.
- Meat:
For the raw steaks on the tray you see here, I used Premo alzarin (I believe it's called) as the base - a nice deep red. I mixed it about 50/50 with translucent, and I even believe I added some beige/dough colored clay afterwards, just to dull the redness a bit. For the raw hams/legs of pork I mixed both beige, red and orange for the base-mix.
Cooked: For something like a cooked ham I'll mix a pink (midtone to light pink, not hot pink) with some red and a tiny amount of dark brown - then I'll add white as I go till I get the color I want. For poultry (chicken, turkey etc.) I'll use mainly beige/champagne/sahara-ish colors and depending on the undertone of the meat I'll add a small amount of pink, brown or yellow.
- Lettuce
 For lettuce I recommend a nice bright/light green - personally I love using 'Cernit light green' - the bright tone will give you that 'fresh, crisp' look. But obviously a piece of lettuce isn't that bright in color, so I usually mix in some white Cernit, but not too much (Or you can mix in some opaque white + translucent). Sometimes I'll even add a small piece of the beige (yes, I use beige tones a lot) to take away some of the green. This mixture is the base and main part of my lettuce - for a more realistic look try mixing in both some darker and lighter shades, creating a marbled look. The variation in color will add so much more to your piece, even though it's barely noticable.
*If there's a color you think is missing, let me know!*


I just love ALL of your tutorials and advice! Ive been at this professionally for about two years now and have followed you from the beginning! You asked if something was missing, not from the color subject but I was wondering if you could cover making things have textures if you havent already. You write a lot, so I need to research if you have already lol. Thank you! Love your stuff so much!!
ReplyDelete-Leia V
Besides the post I've made, going through some of the tools I recommend for miniature food making, I haven't actually made a post about 'texture' - it's a great idea! Will definitely add it to my to-do-list.
Delete